
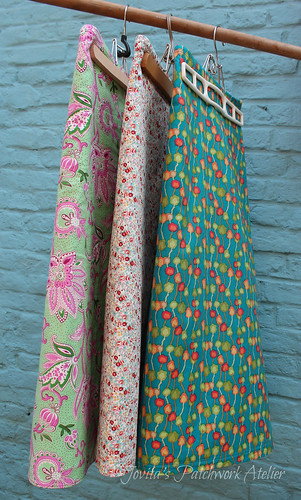
 Three! That's how many I finished before our vacation. It felt great to sew myself some clothes that fit. I have been putting it off for years - honestly! I bought this pattern and three of the fabrics (one still to be sewn) 3+ years ago.
The purchase of this pattern is a long story. Normally I would NOT pay $16 for a very basic pattern - famous designer or not. Long story short I was in a local quilt shop (not mine), liked a detail on the sample that was hanging up and *asked* if I could take a picture. Nope - had to buy the pattern and then still wasn't allowed to take a pic. Needless to say the detail they added was not in the pattern. Thank goodness I didn't buy my fabrics there. I haven't been back.
 So back to the pattern - it's the Barcelona Skirt by Amy Butler. There are a bunch of reviews out there here, here and here. Most were done years ago when the pattern was new and I did look at them briefly just to see what people said - most raved. Yes, I bought fabric way back then. And zippers. But I was just stuck - on that picture. The one on the front of the pattern. Seriously - it looked awkward. It just didn't fit not like I was thinking it should. WHY would they put a picture like that on the front of the pattern?
Needless to say, it took me ages to bite the bullet and cut into my fabrics. But I am so glad I did. Now you should know I'm not new to garment sewing. I've made a fair share in my time. Mainly little girls dresses for my nieces and friends but also the odd grown up thing here and there. And for me it's all about the detail. And the construction. It should be finished and look nice, you know ... just in case you're skirt blows up and everyone sees how you made it.
I am also steadily loosing weight and after reading that the "waist" of this skirt sits at the mid-driff I was even more worried about keeping it on and up. Let alone feeling comfortable in it. But the advantage of below the waist on a plumpy like me is that there are fewer or no shaping (darts or tucks) needed.
So I got a tad bit creative. I wanted to be able to take my skirts in easily
Do you want to see how I did it? Or is that just boring? I'll just run through it quick and if you have questions you can ask, how's that? You can click on the pictures for a better bigger view.
- For starters I serged around every piece. Yes it meant fighting with my serger after many long years but it really made my skirts feel "finished."
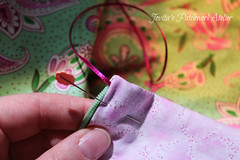
- Sew up the back seam and put in the invisible zipper - google it. They are not hard. Trust me! (I also sewed up the back seam of the lining but didn't do the hand stitching around the zipper yet.
- Attach the front skirt to the front lining and the back skirt to the back lining. Press seam open.
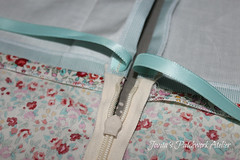
- Add two lengths of ribbon - one to each side. A third will be threaded through the front after the skirt is finished.
- Pin the sides of the skirt together and sew the full length - from the hem of the skirt all the way through the waistline to the hem of the lining. When you get to the waistline backstitch (on the skirt fabric) a few stitches and set off again then about 1/2" into the lining backstitch again. This will allow you to open the side seam to run the ribbons through.
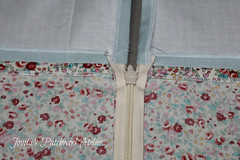
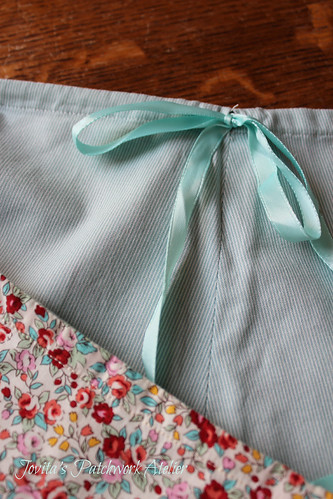
- Fold the skirt down over the lining and pin neatly at the edge of the zipper. Leave the ribbon hanging out the side. Top stitch a 1/2" away from the top edge of the skirt. You can see this best in picture ____.
- There is now a 1/2" casing around the top edge of the skirt. Pick open the side seam of the lining and use a safety pin to thread the ribbons from the zipper edge at the back to the side seam. Use a third (longer) ribbon and thread it through the casing along the front edge of the skirt.
- This is what inside will look like on each side - an easily adjustable waistline. Of the different ribbons I have tried in my 3 skirts I like the one-sided 3/8" satin ribbon best. But next time I might try some simple cotton ribbon I have - I think it will stay tied best.
- The last step is to hem both the skirt and the lining. Have fun - add some detail. You never know .... I'm least happy with the rolled hem on the green skirt and *might* fix it some day but probably not. I top-stitched a tiny 1/16" ribbon along the hem of that lining. The floral skirt got a wide hem and the lining was hemmed with cotton lace and the wrong side of satin ribbon - my favorite! The turquoise skirt also got a simple hem. The obnoxious lime lining is hemmed with an orange gross-grain ribbon.
|
|
|
 |
| step 8 |
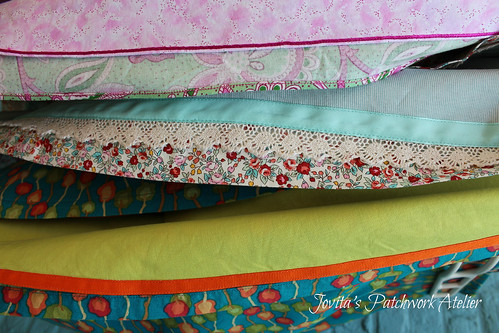 |
| have fun with your hems! |
That's the brilliant part - I think - being able to take them in *easily*. I'll I have to do is pic out part of that top stitching around the waist. Not all the way to the zipper, just far enough to be able to take in the seam along the side. Tapering in at the waist on both the skirt and the lining. Then re-stitch the casing ... yes, being careful to not catch the ribbon but there's no messing with the zipper or taking them apart along the top edge. Just adjust at the sides ... that is when the ribbons don't do they're job anymore. I'm thinking I can cinch them in for a while just using those. Making hmmm, have I really lost, gained or is it "that time of the month" easier to cope with.

Yeh, ok ... I don't like the pic but I knew you'd ask. And most important - ignore the hair. A fly on the wall may have found me ~ the morning we left on vacation ~ in the bathroom, scissors in hand summoning my inner contortionist.
I'll try to have Axel take a better pic of the side - so you can see it really does fit. I am really loving my skirts and have been wearing them nearly every day. The cute new shoes help too!
So ... go sew! More soon, J
***
Via a fun coincidence I discovered
(just 14 hours before it expired)
the Make it May
Sew Along for Skirts!
So I'm linking it up!

You look great! I like the whole outfit...
ReplyDeleteI like it a lot! And love those colors on you!
ReplyDeleteizmir
ReplyDeleteErzurum
Diyarbakır
Tekirdağ
Ankara
1YS
manisa
ReplyDeletesakarya
sivas
van
elazığ
YQVK2
sakarya
ReplyDeleteelazığ
sinop
siirt
van
2HWİ5
uşak
ReplyDeletevan
hakkari
elazığ
bingöl
1HN
FAD20
ReplyDeleteBatman Lojistik
Tunceli Parça Eşya Taşıma
Eskişehir Parça Eşya Taşıma
Bursa Evden Eve Nakliyat
Aydın Lojistik
3AD76
ReplyDeleteKırşehir Parça Eşya Taşıma
Erzincan Şehirler Arası Nakliyat
Kalıcı Makyaj
Rize Lojistik
Elazığ Parça Eşya Taşıma
Yalova Evden Eve Nakliyat
Bursa Lojistik
Kocaeli Evden Eve Nakliyat
Bartın Evden Eve Nakliyat
03006
ReplyDeletePursaklar Fayans Ustası
Ankara Boya Ustası
Aydın Şehirler Arası Nakliyat
Giresun Şehir İçi Nakliyat
Siirt Evden Eve Nakliyat
Erzincan Parça Eşya Taşıma
Adıyaman Lojistik
Şırnak Parça Eşya Taşıma
Bingöl Şehir İçi Nakliyat
03E16
ReplyDeleteSakarya Lojistik
Çerkezköy Oto Lastik
Eskişehir Evden Eve Nakliyat
Niğde Parça Eşya Taşıma
Bilecik Parça Eşya Taşıma
Siirt Parça Eşya Taşıma
Elazığ Şehir İçi Nakliyat
Hatay Parça Eşya Taşıma
Sivas Şehir İçi Nakliyat
B8F58
ReplyDeleteTekirdağ Parke Ustası
Çerkezköy Evden Eve Nakliyat
Osmaniye Evden Eve Nakliyat
Kripto Para Nedir
buy clenbuterol
buy oxandrolone anavar
Aydın Evden Eve Nakliyat
primobolan
fat burner for sale
741FD
ReplyDeleteReferans Kimliği Nedir
Rize Parça Eşya Taşıma
Çorlu Lojistik
Bitcoin Nasıl Alınır
Tokat Lojistik
Malatya Parça Eşya Taşıma
Çerkezköy Asma Tavan
Ordu Lojistik
Diyarbakır Parça Eşya Taşıma
740B7
ReplyDeletesteroids for sale
testosterone propionat for sale
Paribu Güvenilir mi
Aksaray Evden Eve Nakliyat
peptides for sale
Muğla Evden Eve Nakliyat
buy parabolan
Bilecik Evden Eve Nakliyat
buy halotestin
38D47
ReplyDeletedüzce yabancı görüntülü sohbet uygulamaları
kütahya görüntülü sohbet uygulama
canlı sohbet siteleri
telefonda sohbet
canli goruntulu sohbet siteleri
ardahan sesli sohbet sesli chat
bursa mobil sohbet sitesi
artvin görüntülü sohbet odaları
görüntülü sohbet sitesi
C97C7
ReplyDeletecanli sohbet bedava
hatay bedava sohbet uygulamaları
kocaeli nanytoo sohbet
en iyi sesli sohbet uygulamaları
mobil sohbet sitesi
erzincan rastgele görüntülü sohbet
manisa sohbet sitesi
mobil sohbet et
diyarbakır sesli mobil sohbet
FF468
ReplyDeleteyabancı canlı sohbet
Karaman Ücretsiz Sohbet Sitesi
artvin en iyi sesli sohbet uygulamaları
Antalya Sohbet Muhabbet
mardin bedava sohbet siteleri
Samsun En İyi Görüntülü Sohbet Uygulaması
sesli mobil sohbet
Karabük Sesli Sohbet Uygulamaları
Ağrı Telefonda Kızlarla Sohbet
00054
ReplyDeletePinterest Takipçi Hilesi
Kripto Para Çıkarma Siteleri
Btcst Coin Hangi Borsada
Telegram Görüntüleme Hilesi
Aion Coin Hangi Borsada
Kwai Takipçi Hilesi
Binance Madenciliği Nedir
Coin Madenciliği Siteleri
Referans Kimliği Nedir
4F1AB
ReplyDeleteErgo Coin Hangi Borsada
Arbitrum Coin Hangi Borsada
Soundcloud Takipçi Hilesi
Coin Çıkarma Siteleri
Snapchat Takipçi Hilesi
Sohbet
Bitcoin Nasıl Para Kazanılır
Binance Ne Zaman Kuruldu
Bitcoin Madenciliği Nedir
FBVGCHN
ReplyDeleteشركة تسليك مجاري الخبر
gnbgyhnhynhynhj
ReplyDeleteشركة صيانة افران
شركة تنظيف مجالس بالدمام 2l1ZSlwUIu
ReplyDeleteشركة عزل اسطح بجازان PsIM2iSO5Z
ReplyDeleteشركة صيانة افران mGqaaeozk7
ReplyDeleteتسليك مجاري بالهفوف TqhSXHKVLX
ReplyDeleteشركة تنظيف فلل بجازان zPWyDbgJNP
ReplyDelete285F9FCC75
ReplyDeletetakipçi satın al ucuz
F109E3E00D
ReplyDeleteinstagram takipçi arttırma
شركة كشف تسربات المياه بالجبيل P2b0RQywyt
ReplyDelete84C9398AD6
ReplyDeleteinstagram bot takipçi al
twitter beğeni satın al
tiktok takipçi
aktif takipçi
güvenilir takipçi
4D63AAE5EF
ReplyDeletegüvenilir organik takipçi
tiktok beğeni satın al
twitter takipçi
fake takipçi
fake takipçi